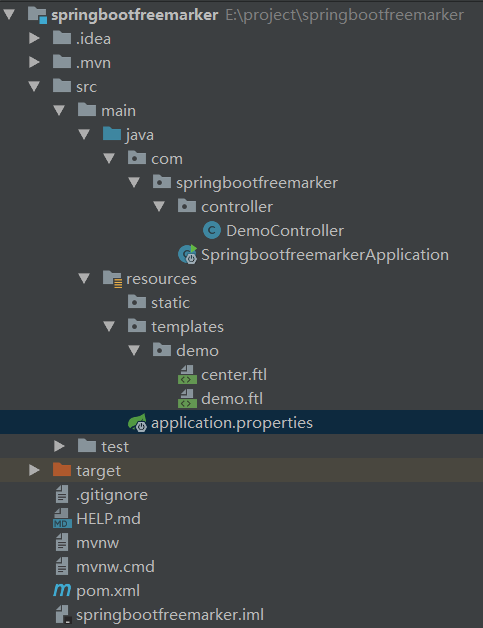
下图是项目的目录结构

1、首先在项目的pom.xml引入freemarker 依赖
<dependency>
<groupId>org.springframework.boot</groupId>
<artifactId>spring-boot-starter-freemarker</artifactId>
</dependency>
2、在配置文件application.properties添加配置
#设定ftl文件路径
spring.freemarker.template-loader-path=classpath:/templates
#关闭缓存,及时刷新,上线生产环境需要修改为true
spring.freemarker.cache=false
spring.freemarker.charset=UTF-8
spring.freemarker.check-template-location=true
spring.freemarker.content-type=text/html
spring.freemarker.expose-request-attributes=false
spring.freemarker.expose-session-attributes=false
spring.freemarker.request-context-attribute=request
spring.freemarker.suffix=.ftl
3、创建freemarker模板
目录:src/main/resources 创建templates文件夹,文件夹里新建demo文件夹,在demo文件夹下建两个文件,一个是demo.ftl文件,一个是center.ftl文件。
demo.ftl
<!DOCTYPE html>
<html lang="en">
<head>
<meta charset="UTF-8">
<title>Title</title>
</head>
<body>
<h1>hello,${user}</h1>
</body>
</html>
center.ftl
<!DOCTYPE html>
<html lang="en">
<head>
<meta charset="UTF-8">
<title>${title}</title>
<style>
table {
width: 50%;
font-size: .938em;
border-collapse: collapse;/*边框合并*/
}
th {
text-align: left;
padding: .5em .5em;
font-weight: bold;
background: #66677c;color: #fff;
}
td {
padding: .5em .5em;
border-bottom: solid 1px #ccc;
}
table,table tr th, table tr td { border:1px solid #0094ff; }/*设置边框*/
</style>
</head>
<body>
<table>
<tr>
<th>Name</th>
<th>Age</th>
<th>Phone</th>
</tr>
<#list users as user>
<tr>
<td>${user.name}</td>
<td>${user.age}</td>
<td>${user.phone}</td>
</tr>
</#list>
</table>
</body>
</html>
控制层代码
@Controller
@RequestMapping("/demo")
public class DemoController {
private String ViewPath = "demo/";
@RequestMapping("/demo")
public String demo(Model model) {
model.addAttribute("user", "张三");
return ViewPath + "demo";
}
@RequestMapping(value ="center")
public String center(ModelMap map){
map.put("users",parseUsers());
map.put("title","用户列表");
return ViewPath+"center";
}
private List<Map> parseUsers(){
List<Map> list= new ArrayList<>();
for(int i=0;i<10;i++){
Map map= new HashMap();
map.put("name","kevin_"+i);
map.put("age",10+i);
map.put("phone","1860291105"+i);
list.add(map);
}
return list;
}
}
访问
http://localhost:8080/demo/demo
http://localhost:8080/demo/center
